
Thinking about building your first simple vaping coil?
That’s great because making DIY coils (or atomizer heads) offer two great benefits.
For one, you can save money on vaping because there’s no need to buy a new coil every time the old one goes out of whack.
Secondly, and most importantly, a high-quality homemade vape coil can improve your vaping experience and enjoy the fruits of your labor.
If you don’t want to throw blind guesses when building your first simple coil, this is the only guide you’ll ever need.
We cover everything, from what vape coils are to how to build them and what to look for in your first coil-building kit.
Let’s get started!
What Are Vape Coils?
Although commonly referred to as coils, they’re actually atomizer heads. The coil is an element inside the atomizer. But considering the diversity of vape lingo, we know exactly what you mean when you say coils.
Think about the coil as the heart of your vaporizer — your vape mod is the body — a part without which vaping would only be a fool’s dream.
An atomizer head contains a coil of wicking material and thin wire. We’ll shed more light on these details later in the article, but simply put, the atomizer creates vapor.
There are many vape coils to choose, depending on the type of experience you’re seeking. Different coil materials, resistances, sizes — they all matter.
Breaking Down the Anatomy of a Vape Coil
An atomizer head is where the energy from the e-cig battery gets converted. It also heats the coil inside, causing the vaporized e-liquid to soak into the wicking material, which you then inhale.
Easy peasy, right?
Let’s see if you get the anatomy of your vape coil with similar ease.

Main body
The main body supports the individual elements of the atomizer head. It’s the outer casing that you plug to the base of the tank in order to spur electrical contact to the coil.
Coil
When you press the “start” button of your vaporizer, it becomes the power source for the coil, which is a thin wire wrapped into a coil shape. This is also where that power converts to heat. If you could observe the coil, it sometimes glows red when you’re pressing the button. Once there, the coil vaporizes your liquid from the saturated wick.
Wicking Material
The wicking material absorbs the liquid within the atomizer head. It’s usually made out of silica or natural cotton rope. It’s either inserted through the coil or surrounds it to naturally absorb the liquid from the tank by simply sucking it up.
The Importance of Coil Resistance
The performance of your atomizer head will depend on its electrical resistance, which is measured in ohms. There are two categories of coils when it comes to their electrical resistance — low-resistance coils and high-resistance coils.
Low Resistance Coils
Low resistance coils have a resistance less than 1.0 ohm. Also known as “sub-ohm,” this type of coil typically calls for higher powers and is better suited for:
- Using more e-liquid
- Producing larger clouds of vapor
- People with unique e-cig models (low-resistance coils don’t work with all vapes)
High Resistance Coils
High resistance coils have a resistance above 1.0 ohm. They work better with users who want:
- Smaller clouds of vapor
- More efficient e-liquid distribution
- Coils that will suit most e-cigs

Do You Want a Micro Coil or Macro Coil?
When searching for different coil builds, you’ll most likely stumble upon two types — micro and macro coils. These types of coil builds are made by taking a small piece of wire and wrapping it around a screwdriver or a similar tool.
The only difference between a micro and macro coil is the diameter inside the coil.
The bigger the build of your coil, the higher its resistance. Following through, the thicker the gauge of your wire, the lower the resistance will get. In our opinion, the best type to make your first few vape coil builds is a basic 26 or 28-gauge Kanthal.
Single Coils vs Dual Coils
Some coil builds feature two coils instead of one, hence the name “dual coils.” Not all atomizers are designed to handle both, and those that do will usually provide better performance with one of the two options. Go through some trial and error, and experience the pros and cons of each type of coil. When making a dual coil build, keep in mind to ensure that both coils are identical in size and design to avoid problems with uneven heating.
Why You Should Consider Building Your Own Vape Coils
As mentioned, building your own vape coils saves you money on vaping. Rather than buying disposable coil heads every week and creating unnecessary waste, you can make a DIY coil that will not only last you longer but also eliminate the side costs included in the final price of a store-bought coil. If you want to employ more minimalism in your life and get more fun from mastering your craft, you should, at least, consider trying it.
Simple Coil Building 101 for Vaping Beginners
Now that we’ve established the benefits of making your own simple coil for vaping, let’s move to the technical part of our guide. In the next section, we’ll elaborate on the necessary prep work.
A Quick Check List Before You Build Your First Simple Coils
Of course, there are plenty of types of vape tools and accessories you can use to make a simple coil for vaping. You can also find pre-made coil building kits on the market that provide you with everything you need, but then again, doing your own prep work instead of relying on store-bought solutions will save you money on vaping.
Chances are you already have those supplies at home, especially if you’re into manual work.

What You Need to Build a Vape Coil:
- Ceramic tweezers
- Flush clutters
- Organic cotton
- Resistance wire
- Scissors
- Small metal rod
- Ohm reader
- Coil jig
A Coil Jig: How to Use It
A coil jig is the tool that will help you wrap coils consistently by controlling the wire’s route as you’re wrapping it on a rod. Coil jigs are very useful when you want to make perfect coils every time with almost no effort. Most coil jugs have detachable rods, but some models will require you to buy separate pieces for different wire diameters.
How to Build a Simple Coil for Vaping
This is our step-by-step guide for building a simple coil for vaping. Read it carefully, follow the instructions, and you’ll end up with a decent coil that can improve the performance of your E-liquid device.
1. Wrap the Coil
This is where you need to take your tweezers, screwdriver, and wire. The point is to keep the top of the screwdriver as close to its handle as possible.
Then, hold the end of the wire closest to the screwdriver with your thumb. From there, you can start wrapping your wire around the tool until you’ve reached the optimum number of 8 wraps. Make sure to keep the wire tight as you’re wrapping it around the screwdriver to eliminate loose moments.
Pull on the other lead using your tweezers and repeat the process. This will help you remove any extra slack your coil may have. Do not remove the coil from the screwdriver at this point!
2. Install Your Coil
Now you want to take the build deck of your RDA and loosen the post screws as far as you can. Don’t remove the screws completely because they can be difficult to put back in when you have your hands already busy.
Next thing you need to do is take the coil that’s still wrapped around the screwdriver and place one lead in the positive post hole and the other in the negative hole. Position the coil towards the center of your RDA using the screwdriver. Once it’s been positioned correctly, it’s time to tighten your post screws. Remember not to go overboard with that because you might cut the wire inside the post and your precious time will go down the drain.
The last step here is to securely trim the leads as close to the post as you can.

3. Test Your Coil for Shorts
Screw your RDA on to your ohms reader and turn it on to test if your RDA doesn’t have shorts.
The LED screen should indicate target resistance around 1.2 ohms but normal coils ten to have a slight variance in their resistance up to 0.2 ohms.
If your coil shows the right resistance within 0.2 ohms, you can move further. However, if your ohm reader displays a higher discrepancy, there’s a problem you need to fix.
You can check your RDA’s post screws to make sure they’re tight enough; also, make sure your coils positioning is right and the coils aren’t touching the deck or posts. Your atomizer must be completely screwed into the ohm reader. These are the most common problems that can be easily fixed.
If the problem still exists, try making another coil. Should you continue to fail, there might be an issue with your ohm reader or with your atomizer.
4. Test-fire Your Coil and Eliminate Hot Spots
Okay, so you have your coil installed properly and you’ve made sure there are no shorts. This is the time to attach the RDA to your mod. Once done, you want to briefly fire your mod until you see the coil glowing. At that point, you should stop firing the mod and delicately squeeze the coil together using your tweezers. Repeat the process until you achieve an even glow for your coil.
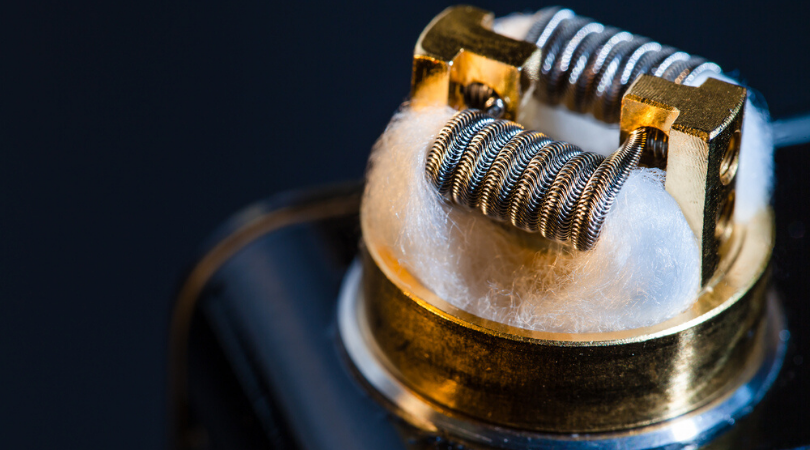
5. Wick Your Coil
You can use different material for this stem — from silica to eko-wool and cotton — but we consider organic cotton to be the superior choice for the wick. It just has better wicking abilities and produces more flavorful hits than other materials.
Your wick should be just big enough to smoothly fit inside the coil, leaving about half an inch of free space on either side. Push the wick in from one side of the coil and pull it out from the other one, wetting and twisting the end of your wick for an easier start.
Once you’ve threaded the wick through the coil, trim the excess material so they’re just long enough to fold them over your RDA. Finally, add a few drops of your E-liquid and fold them on to the RDA deck, paying attention not to push them too deep, as it can clog the airflow.
6. Run a Second Test
Once you’ve wicked your coils, it’s paramount that you check your RDA’s post screws again to make sure they’re tight. Then run a second test for your resistance on the ohm meter. It may happen that your resistance changes slightly — 0.2 ohms more or less — but this isn’t anything to be afraid of. If there’s an issue with one of the above, you’ll need to recheck everything by deconstructing your coil and to find the root of the problem.

7. Vape it!
Congratulations, you’ve just built your very first coil for vaping. Soak some of your favorite E-liquid into your wicks, replace your RDA’s cap, press the power button, and enjoy superior vapor quality!
Key Takeaways on Simple Coil Building for Vaping
Building your own coils for vaping requires you to take some necessary safety measures. It’s crucial to know the limits of your vape pen, both when it comes to hardware and batteries. Never try to work at resistances that will go beyond their recommended operating capacity. In addition, remember that exposed coils when installed and triggered on your vape are very hot, so please approach them with caution. Last but not least, never rebuild your own coils without an ohms reader.
Do you make your own coils for vaping? Let us know in the comment section below!